Background
WordPress lets you categorise your posts according to “tag”, and “category”. Which is fine. However, for some time now WordPress has supported a concept called “Custom Taxonomies”. Which is a long winded way of saying “We’ll let you choose how your organise and present your posts – however you want”.
This isn’t something I’ve ever felt the need to use before (I’m happy enough with tags on this blog) – however having used them recently I’ve really begun to appreciate how powerful they are – and I’m amazed that more people don’t use them to create a more sensible structure to their WordPress sites.
That said, I’m a bit of a geek, who’s not averse to diving into code, and isn’t intimidated by a set of cryptic API documentation 🙂
The Business Case
So, what can taxonomies do for you?
The site I built this for is a resource all about baby slings, the different types, the different brands, and people’s experiences, of finding, choosing, and using them.
Tagging just seemed to create a big, hard-to-navigate tag cloud that didn’t create an easy way for people to find the right content on the site that was going to be useful to them (Feedback has suggested that people are either looking for information about a particular brand, or a specific type of sling irrespective of brand).
The How-To
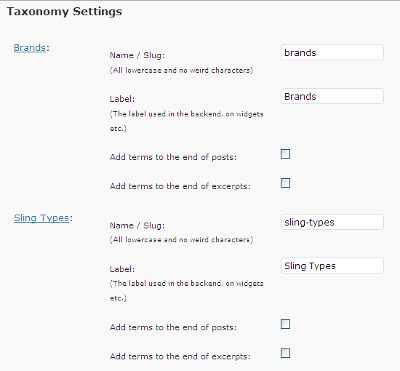
So, out went the “tags” (We removed them from most old posts, don’t add them to new posts, and got rid of the “tag-cloud”). Next step was to install Joost de Valk’s Simple Taxonomies plugin. This is one of Joost’s simpler plugins. In general all it does is let you create a taxonomy, and manage the terms within that taxonomy.
Actually, as an aside – I suspect this is why custom taxonomies haven’t really taken off. Out-of-the-box you have to create code to set them up and use them for effective site navigation. If the functionality provided by Joost’s plugin was in WordPress core, and theme authors really started coding for this stuff, I’m sure it would fly, but I digress …
So, using the plugin, we created two taxonomies – “Brands”, and “Sling Types”.

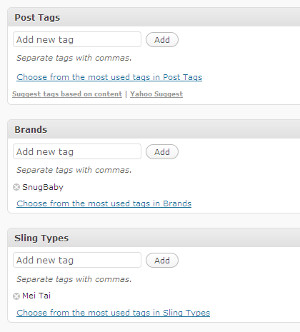
Next step was to go back through our posts (Fortunately this was in the early days of the site!), and correctly “tag” the posts against the right taxonomies. So on the SnugBaby review, we set the “Brands” to “SnugBaby”, and the “Sling Types” to “Mei Tai”.

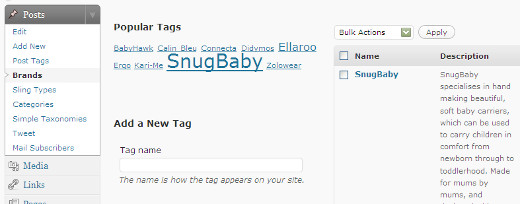
Now we’ve got all of our posts beautifully organised, but we don’t have a way to view them. Before we get to that though, there’s just one more step. For every “term” (ie, for every brand, or sling type) we need to provide a description. Your new taxonomies can be found in the “Posts” section of the WordPress backend, simply click on the taxonomy, e.g. “Brands”, then work your way down the list adding a useful description.

Now we can actually start presenting this information sensibly!
Theme Work
Now, we’re going to use that list of “terms”, and their descriptions, to create a top-level list of “brands”. Download the file below, and save it in your WordPress theme directory. We called it “brand-directory.php”, but the name doesn’t really matter.
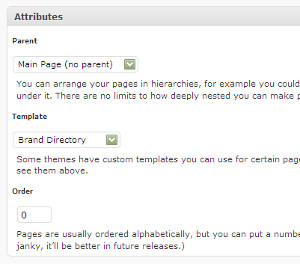
This will create a new page template called “Brand Directory” (If you want to change the name, edit the comment at the top of the file). Now create a page in WordPress, provide some content that you’d like to use as an introduction, and set the page template to this new file:

Basically all this file does is display the page content you created:
<?php the_content(); ?></p>
followed by each one of the terms that you’ve used, along with it’s description:
$terms = get_terms(‘brands’);
foreach ($terms as $term) {
echo $term->description;
and a link to all of the posts that have been assigned to that term:
$wpq = array (‘taxonomy’=>’brands’, ‘term’=>$term->slug);
$query = new WP_Query ($wpq);
$article_count = $query->post_count;if ($article_count) {
echo “<a class=\”taxonomy-rel-link clearfix\” href=\”/brands/”.$term->slug.”\”>”.$article_count;
} else {
echo “<span class=\”taxonomy-rel-link\”>$article_count”;
}echo ” related article”;
if ($article_count!= 1) echo “s”; else echo “”;
if ($article_count>0) {
echo ” – click to view</a>”;
} else {
echo “</span>”;
}
echo “<br />”;;
And there you have it, a dynamic data driven directory that keeps itself up to date whenever you “tag” a brand – all you have to do is add a description for the brand!
For an example see the “Get Your Hands Back!” brand directory here.
Pingback: Using Wordpress taxonomies to create a product directory | bllogger
Pingback: Custom Taxonomies In Wordpress Plugins – Lee Willis’ Blog | leewillis.co.uk