Lee Willis

April 18, 2024
by Lee
0 comments

Using files in plugin preview blueprints

Recently WordPress launched the WordPress playground – a serverless version of WordPress that runs inside a browser. This is, by itself, pretty neat.

More than that though, the playground offers an easy way to try out WordPress themes and plugins without worrying about the hassle of setting up a site themselves. Users can do that themselves, by constructing URLs to automatically launch the playground with certain plugins installed, or manually installing them once the playground has launched but it’s not that straightforward.

The great news is that the WordPress.org plugin directory also supports easily “Live Previews” for plugins using the WordPress playground.

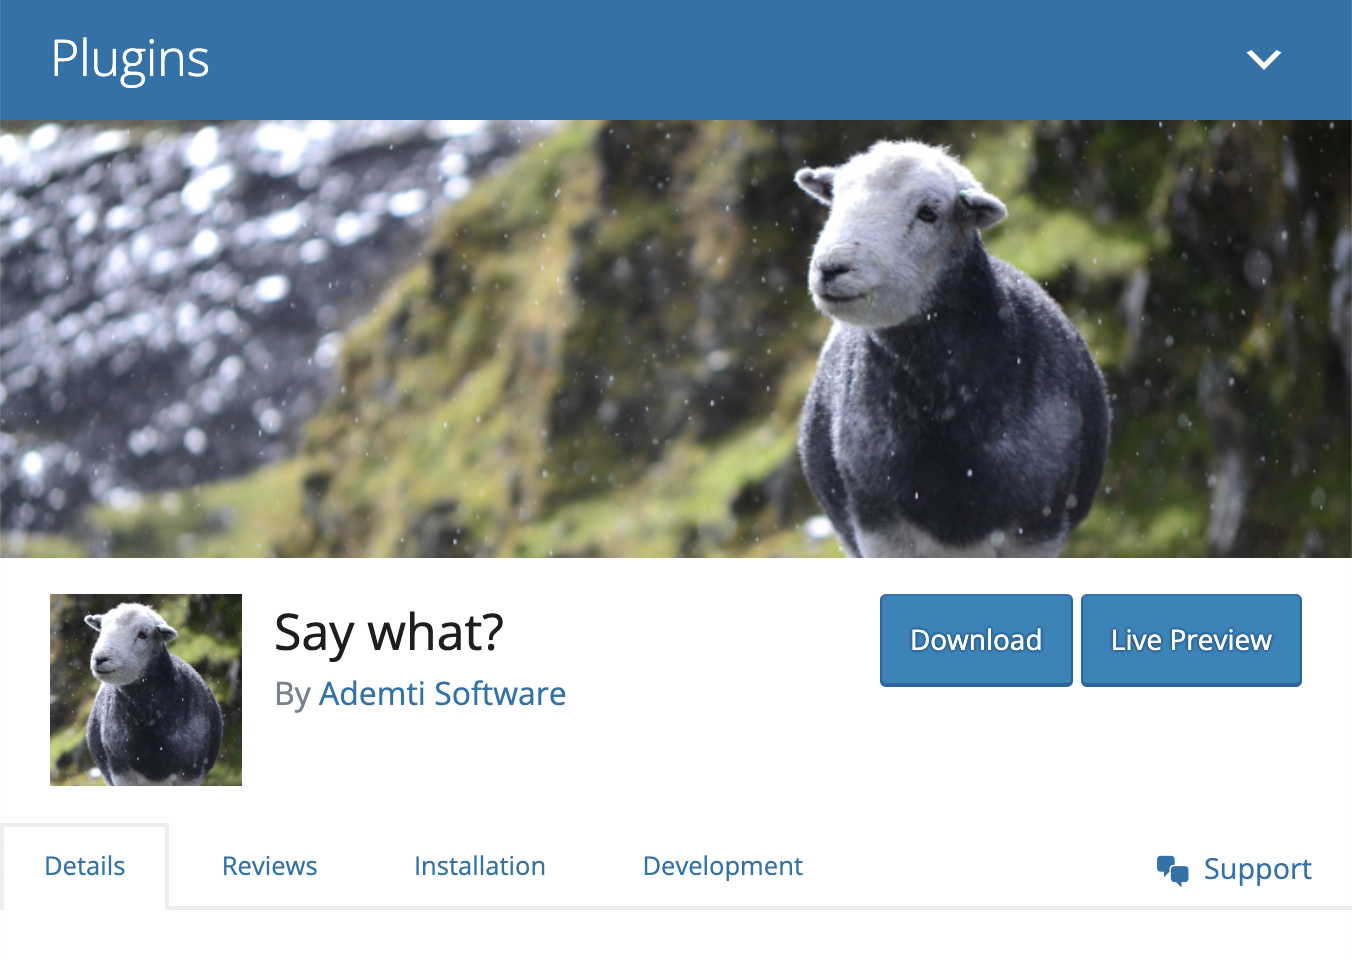
The process is opt-in at the moment, but if a plugin author has opted in to Live Previews, then you’ll see a button to launch the preview right on the plugin page on WordPress.org. Here’s what it looks like for the Say What? string replacement plugin which is opted in to Live Preview.

The WordPress.org plugin directory implementation is driven by ‘blueprints’. These offer a way for plugin authors to configure how the playground will be launched by providing a simple JSON file.

WordPress.org will generate a default blueprint.json file for you as a starting point to opting in to Live Previews. That blueprint will install WordPress, and the selected plugin automatically. Here’s what a default blueprint.json looks like for the Say What? plugin:

{
    "landingPage": "\/wp-admin\/plugins.php",
    "preferredVersions": {
        "php": "8.0",
        "wp": "latest"
    },
    "phpExtensionBundles": [
        "kitchen-sink"
    ],
    "features": {
        "networking": true
    },
    "steps": [
        {
            "step": "installPlugin",
            "pluginZipFile": {
                "resource": "url",
                "url": "https:\/\/downloads.wordpress.org\/plugin\/say-what.2.2.2.zip"
            },
            "options": {
                "activate": true
            }
        },
        {
            "step": "login",
            "username": "admin",
            "password": "password"
        }
    ]
}

For many plugins this may well be sufficient. It will install the latest WordPress release, install and activate the plugin and login the user with the default admin user.

However, plugin authors can add additional steps to the blueprint before making it available to users. The blueprint can install other themes, plugins, define PHP functions, or run custom PHP. You can run SQL queries, import dummy content using the WordPress importer and even run WP-CLI commands.

In our case, to show off what the Say What? plugin can do, we’d like to launch the preview straight to the plugin’s admin page, with a number of example replacements set up.

We could do that by running custom PHP, or SQL queries in the blueprint, however in order to keep the blueprint as simple as possible we decided to use the WP-CLI import command that the plugin already makes available.

Here’s how you’d normally use it to import a set of replacements from a CSV file:

$ wp say-what import my-replacements.csv

The question is though – how do we pass our ‘sample data’ file to the playground?

I tried a few different approaches – initially assuming that the playground would have access to the files from the WordPress.org plugin’s ‘assets/blueprints’ folder which is where the blueprint.json file lives. That isn’t the case though. The playground is passed your blueprint.json file, but beyond that it’s a completely standalone instance.

It wasn’t initially too clear from the docs how to run a WP-CLI command that accepted a file as input, but a GitHub issue asking the question led to an excellent answer from Adam Zielinski (the creator of the WordPress playground) showing just how easy it can be.

Your blueprint.json can specify a ‘writeFile’ step which can take an external URL as the source, and will write out the file somewhere that your subsequent steps can access.

So, here’s the two steps I ended up adding to the Say What? blueprint.json file:

 {
     "step": "writeFile",
     "path": "\/wordpress\/sample-replacements.csv",
     "data": {
         "resource": "url",
         "url": "https:\/\/raw.githubusercontent.com\/leewillis77\/say-what\/sample-replacement-branch\/sample-replacements.csv"
     }
 },
 {
     "step": "wp-cli",
     "command": "wp say-what import \/wordpress\/sample-replacements.csv"
 }

In the first step, we pull down a file from GitHub*, and write it out as ‘wordpress/sample-replacements.csv’. In the second step we run our WP-CLI command and pass it the filename of the downloaded file, and everything works as normal.

* Note: It would be nice to pull this from the wordpress.org repo, but there are some restrictions on where resources can be fetched from around CORS headers, which the wordpress.org repo doesn’t currently support – hopefully that will be fixed in the future.

If you want to see the full blueprint.json file for Say What? you can see it here.

Want to see the live preview in action – simply hit the Live Preview link on the plugin’s wordpress.org page, or click here to launch it directly.

February 16, 2018
by Lee
0 comments

Using oEmbed resources in Laravel

On a recent project we had a requirement to let users easily include social media such as YouTube videos, and Instagram posts in their content. We choose to follow the WordPress-embed style functionality where simply including a link to the social media in the post would embed it using oEmbed discovery.

oEmbed allows a service (such as YouTube, or Instagram) to be queried in a standard way, and to return markup representing the resource. Embedding a YouTube video this way does what you’d expect – an embed of the video. Embedding Instagram embeds the image in an Instagram frame.

Before…


After…

In WordPress, all of this happens without the content author having to do anything complex – just paste in the URL of the content they want to embed into their post, and WordPress does the rest. We wanted to reproduce those features, and ease of use in our project, which isn’t WordPress, but based on the Laravel framework.

There are however plenty of libraries that you can use to do the heavy lifting – particularly embed/embed:

This lets you simply pass in a URL and get back all sorts of information, including the title, image, and embed code so you can use it how you like. This allowed us to get a proof of concept up and running in our project pretty quickly. However – everything was being embedded in realtime, with oEmbed calls being made to embed resources every time we loaded a page.

To solve this, we created a bridge between Laravel’s cache system and the embed library such that we can load an embed once, and cache the embed code produced, and just re-use that, decreasing load on external services, and increasing load times.

Usage, is simple you just use it as you would embed/embed. If the data is in the cache it will come from there, otherwise it will be fetched and cached automatically.

Happy embedding!


This is post 17 of 17 in the series “Stuff I've Used”

A series of short blog post covering software components / services I’ve used on projects to say thanks to the authors, and share them with others who might find them useful.

  1. Stuff I’ve used
  2. Error tracking with Sentry
  3. Autotrack for Google Analytics
  4. WordPress performance tracking with Time-stack
  5. Enforce user password strength
  6. WYSIWYG with Summernote
  7. Backing up your Laravel app
  8. Adding Google Maps to your Laravel application
  9. Activity logging in Laravel
  10. Image handling in PHP with Intervention Image
  11. Testing Laravel emails with MailThief
  12. Assessing software health
  13. IP Geolocation with MaxMind’s GeoLite2
  14. Uptime monitoring with Uptime Robot
  15. Product tours with Hopscotch
  16. Background processing for WordPress
  17. Using oEmbed resources in Laravel

March 27, 2017
by Lee
0 comments

Background processing for WordPress

I’m the maintainer of a reasonably well-used WooCommerce plugin that currently generates a full set of product data from a store This is currently done on-demand to make sure the information is up to date. On smallish stores, everything works just fine. It’s even OK on larger stores as long as your hosting is ‘modern’ (think reasonable PHP versions, execution limits, persistent object cache etc.).

However, some client hosting can’t always manage to pull products, build product objects, apply business logic for output, and construct the output for all products within execution time limits / memory limits. This is especially the case for stores which may have large inventories, but not necessarily high levels of site traffic. These people have had to make do with generating multiple, partial feeds which increases complexity for them, and can cause other issues around re-use of output data with multiple integration partners.

There’s a couple of obvious approaches to solving this:

  1. Make the processing less complex
  2. General code optimisations
  3. Pre-generate the output and cache it

I’ve looked at, and worked on, several of these avenues over the years, [1] and [2] have given me some pretty good results, and even proved a learning opportunity in WordPress internals at times…

https://twitter.com/leewillis77/status/768859124339736577

It’s now reached the point that the only way to eek out more performance would be to stop using WordPress to generate the content, and to pull it out with straight database queries instead. This would no doubt be a lot quicker, and a lot lighter on CPU.

However, it misses out on a lot of the point of WordPress – that plugins can add, update, and remove information programatically.

From my support work on the plugin over the years, it’s clear that many people rely on plugins / hook customisations to get their final data to be what they want. Raw SQL queries would most likely result in incorrect data, so it’s not really an option.

That leaves us with item [3] – pre-generating the output and caching it. Due to the previous scalability concerns though – we can’t assume that we can generate the full output in a single request. Nor do we want to have to invalidate the full output if a single product, or category is changed.

The solution I’ve settled on generates cached output for each item included in the full output. This gives a couple of benefits:

  1. We can generate our final output with a simple SQL query to pull all of the fragments. This is quick. We also don’t have to  worry that information won’t include input from other plugins on the site as full processing was used to build the fragment
  2. We can invalidate, and rebuild single products, or sets of products without having to invalidate everything
  3. We can build up our cached output in parts, we don’t have to generate it all at once

I was left with a requirement for background processing infrastructure that the pre-generation, and batched invalidation could be handed off to.

I’ve been working a lot with Laravel recently. One of its strengths, and something I’ve used on most (if not all) of my Laravel projects is its Queue implementation. It allows you to easily add jobs to one or more queues, and have them processed by workers in the background. You can set up multiple queues, and you’re in control of how many workers you set up, and which queues they’ll process. The library is usable standalone – it can be used outside of a Laravel project. Unfortunately this plugin supports WordPress’ minimum requirements which are still anchored at PHP 5.2, while Laravel’s Queue system requires 5.6.4 minimum making it a non-starter.

Fortunately, I came across and mentally noted the WP Background Processing library from Ashley Rich / Delicious Brains a while ago:

It’s the perfect solution to this problem. It’s simple, and lets you build background jobs that will run automatically through WordPress’ existing cron infrastructure, taking care to balance running as many jobs as possible in an execution with getting through the jobs as quickly as possible. It’s also compatible with PHP 5.2.

Using the library has let me build out some pretty neat invalidation / pre-generation jobs without having to worry about putting together the cron logic myself. Definitely worth looking at if you need to do any background processing in WordPress plugins.

This is post 16 of 17 in the series “Stuff I've Used”

A series of short blog post covering software components / services I’ve used on projects to say thanks to the authors, and share them with others who might find them useful.

  1. Stuff I’ve used
  2. Error tracking with Sentry
  3. Autotrack for Google Analytics
  4. WordPress performance tracking with Time-stack
  5. Enforce user password strength
  6. WYSIWYG with Summernote
  7. Backing up your Laravel app
  8. Adding Google Maps to your Laravel application
  9. Activity logging in Laravel
  10. Image handling in PHP with Intervention Image
  11. Testing Laravel emails with MailThief
  12. Assessing software health
  13. IP Geolocation with MaxMind’s GeoLite2
  14. Uptime monitoring with Uptime Robot
  15. Product tours with Hopscotch
  16. Background processing for WordPress
  17. Using oEmbed resources in Laravel

March 7, 2017
by Lee
4 Comments

Custom model events with Laravel 5.4

Laravel’s eloquent ORM has a nice system for tracking, and responding to events on models. This allows you to create an Observer class that handles code that should run when various actions are performed on a model. There are a set of standard events (created, updated, deleted etc.) that can be used to achieve many things. These can be useful if you need to send notifications when a new model is created, or update something when a model is updated.

However, as your models get more complex, you may find yourself needing different events. Imagine you have a content model which has statuses, for example draft, pending review, and published. If you want to perform different actions based on the model status then you can attach an observer to the model, and listed for the created / updated events.

You can then check the new status and fire off the relevant code. This can get messy though, and also doesn’t reflect what happened to the model to move it into it’s current status. For example, is the content in “pending review” because it’s a draft that someone wants to publish, or an article that was published but has been bumped back down for review? The current model status doesn’t tell you that.

Now, you can create your own events in Laravel, and fire them off, however that would mean you have some event listeners in your model observer, and some in a bespoke event listener. Messy.

It’s nicer to be able to handle everything the same way. Fortunately Eloquent’s model event system can be extended to support custom events which you can fire at the appropriate point.

To add a new event, simply set the $observables property on your model.

<?php

use Illuminate\Database\Eloquent\Model;

class MyContentModel extends Model
{
  /**
   * Additional observable events.
   */
  protected $observables = [
    'sentforreview',
    'rejected',
  ];
}

This tells Laravel that there are two new model events that an observer can listen for. In our observer, we can listed to these by defining the appropriate function as we would with any of the standard events:

<?php

namespace App\Observers;

class MyContentObserver
{

  public function sentforreview(MyContent $myContent)
  {
    // Your logic here.
  }

  public function rejected(MyContent $myContent)
  {
    // Your logic here.
  }

}

So far, so good. We have defined our custom observables, and built a method to listed for them. However – the event will never be fired. After all, Laravel doesn’t know when it should be fired. Firing the event is simple though. Within your model you simply call fireModelEvent() and tell it the event you are firing, for example:

<?php

use Illuminate\Database\Eloquent\Model;

class MyContentModel extends Model
{
  public function sendForReview()
  {
     // Do any other updates to the model here.
     // Then fire the event.
     $this->fireModelEvent('sentforreview', false);
  }

  public function reject()
  {
     // Do any other updates to the model here.
     // Then fire the event.
     $this->fireModelEvent('rejected', false);
  }
}

Now, you can have a single model observer that handles standard, and custom events keeping everything nice and tidy.

February 20, 2017
by Lee
0 comments

Product tours with Hopscotch

I’m just about to launch a brand new project to the world. As a small business, part of the work I’m doing on the project is looking at how I can use smart technology solutions to engage with new users automatically, and help them through the process of getting up and running.

If you’ve used modern software-as-a-service products – you’ll be familiar with these sorts of solutions, that can include things like:

  • Online knowledgebase articles
  • Drip-fed email series
  • Online product tours

I’ll probably talk about some others another day, but today I’m looking at “Online product tours”. This is where you have pop-up dialogs guide the user through key features of your app. Not sure what I mean, check out the final result, the welcome tour on MyHill.blog.

I looked at a couple of Javascript based open source packages when I was building the tour:

As you might have guessed from the article title, I finally settled on Hopscotch for my tours. For me, the advantages where the ease with which I could get multi-page tours set up, support for callbacks, and of course the actual user-facing experience.

Shepherd was my first favourite, and I got most of the tour implemented in this initially. However I hit a couple of issues running some code I needed on callbacks – I couldn’t easily get them to run at the right time. The transitions between steps were also a little harsh for my liking, it was easy to get confused jumping between sections of (potentially) long pages. Other than that though it was a solid, good-looking solution.

I really liked the highlighting offered by intro.js, but it didn’t quite work for everything I wanted to do, and the out-of-the-box theming was a little simple for my liking. Other than that though it also seemed fairly nice.

Overall, I think I’d be happy working with any of these three in the future, but Hopscotch was definitely the best match for this project.

This is post 15 of 17 in the series “Stuff I've Used”

A series of short blog post covering software components / services I’ve used on projects to say thanks to the authors, and share them with others who might find them useful.

  1. Stuff I’ve used
  2. Error tracking with Sentry
  3. Autotrack for Google Analytics
  4. WordPress performance tracking with Time-stack
  5. Enforce user password strength
  6. WYSIWYG with Summernote
  7. Backing up your Laravel app
  8. Adding Google Maps to your Laravel application
  9. Activity logging in Laravel
  10. Image handling in PHP with Intervention Image
  11. Testing Laravel emails with MailThief
  12. Assessing software health
  13. IP Geolocation with MaxMind’s GeoLite2
  14. Uptime monitoring with Uptime Robot
  15. Product tours with Hopscotch
  16. Background processing for WordPress
  17. Using oEmbed resources in Laravel

January 18, 2017
by Lee
0 comments

Uptime monitoring with Uptime Robot

The rest of this series has mostly covered things you’d use when building a site. Once you’ve finished building though, and your new site has gone live there are plenty more things you need to do. There’s hosting, SSL certificates, CDNs, and a variety of other services that only apply when a site is in production.

If you’re doing things properly you’ll almost certainly want to monitor your live site.

There are a multitude of things that you can monitor.  I’ve touched on monitoring previously where I talked about how I use sentry.io to track application errors. You might also want to:

  • track user behaviour (I wrote about using Google Analytics’ advanced analytics monitoring in a recent post)
  • monitor and analyze server performance (I use Newrelic)
  • analyze deep language internals / code-paths (Blackfire is pretty awesome for PHP).

For me though, the most basic, and essential need is to understand whether your application is up and running. I’ve used Uptime Robot for this for a while. They have a free tier that provides everything you need for day-to-day monitoring. This provides up to 50 different monitors, checked every 5 minutes, with email alerts when sites go down.

Their standard HTTP monitors checks if the specified URL responded with a positive HTTP response. They also offer keyword monitors where it will fetch a page and check for the presence or absence of specified keywords.

Once you need to go beyond that, they have a very reasonably priced Pro plan that gives more frequent checking, complex alerting rules, and SMS alerts. Perfect for higher value sites.

For me, UptimeRobot is a perfect example of a service that does one thing, and does it well.

This is post 14 of 17 in the series “Stuff I've Used”

A series of short blog post covering software components / services I’ve used on projects to say thanks to the authors, and share them with others who might find them useful.

  1. Stuff I’ve used
  2. Error tracking with Sentry
  3. Autotrack for Google Analytics
  4. WordPress performance tracking with Time-stack
  5. Enforce user password strength
  6. WYSIWYG with Summernote
  7. Backing up your Laravel app
  8. Adding Google Maps to your Laravel application
  9. Activity logging in Laravel
  10. Image handling in PHP with Intervention Image
  11. Testing Laravel emails with MailThief
  12. Assessing software health
  13. IP Geolocation with MaxMind’s GeoLite2
  14. Uptime monitoring with Uptime Robot
  15. Product tours with Hopscotch
  16. Background processing for WordPress
  17. Using oEmbed resources in Laravel

November 15, 2016
by Lee
0 comments

IP Geolocation with MaxMind’s GeoLite2

IP geolocation is something that’s needed more and more as people publish & trade internationally. Stores want to offer different pricing, currencies, shipping rules to different countries, or provide content in different languages.

Many systems have something already baked in, but working on a project recently I needed to do some simple country-level IP geolocation. My previous iteration had used a third party service, but that slowed things down, and had a tendency to be unreliable – recently going AWOL for a couple of weeks!

There are some free GeoLocation databases provided by MaxMind, but I doubt I’m telling you anything new there, it seems to be fairly well known about. However I’ve never actually used them myself directly, so in I dived.

Firstly I used their public PHP wrapper:

I was able to pull it into my project using Composer really easily, download the database and hook it up simply. Running a geolocation really was as simple as their documentation suggested, I ended up with this in my code:

$reader = new GeoIp2\Database\Reader( GEOIP_DB_PATH );
$record = $reader->country( $this->get_user_ip() );
$country = $record->country->isoCode;

Really nice and simple, and a lot more reliable than my previous solution, and definitely something I’d use again in the future without hesitation.

Image credit: https://commons.wikimedia.org/wiki/File:Red1234.jpg

This is post 13 of 17 in the series “Stuff I've Used”

A series of short blog post covering software components / services I’ve used on projects to say thanks to the authors, and share them with others who might find them useful.

  1. Stuff I’ve used
  2. Error tracking with Sentry
  3. Autotrack for Google Analytics
  4. WordPress performance tracking with Time-stack
  5. Enforce user password strength
  6. WYSIWYG with Summernote
  7. Backing up your Laravel app
  8. Adding Google Maps to your Laravel application
  9. Activity logging in Laravel
  10. Image handling in PHP with Intervention Image
  11. Testing Laravel emails with MailThief
  12. Assessing software health
  13. IP Geolocation with MaxMind’s GeoLite2
  14. Uptime monitoring with Uptime Robot
  15. Product tours with Hopscotch
  16. Background processing for WordPress
  17. Using oEmbed resources in Laravel

November 4, 2016
by Lee
0 comments

Assessing software health

First, a question…

When you find a piece of software to fill a specific need on a project, do you:

  1. Add it in straight away while proclaiming “Open source is awesome, on to the next feature everybody!”
  2. Proceed cautiously, taking a good look at the project’s health before adding it in

If you picked option 1, then congratulations; this blog post is firmly for you.  If you picked option 2 then you’re already ahead of the game, but hopefully this will give you some thoughts about how you assess project health.

A lot of the agencies (and freelancers) that I’ve worked for, or with, have got some way of assessing project health when considering software to add to their project. For larger agencies that might be formal, written-down rules. In smaller agencies its often unwritten “best-practice”. For freelancers, it’s commonly just a mental checklist / gut-feel that gets worked through.

As I’ve moved into working more heavily with new frameworks over the past 6 months, I’ve had to do my fair share of searching for new (to-me) software to plug missing holes. I’ve posted about a lot of the solutions I’ve found in my Stuff I’ve Used series.

There were a couple that I had on my shortlist to cover, but I’ve since decided need to be covered differently. The main reason is that while they solve my problem today, I’m not confident with the health of the projects to view them as long term / maintainable solutions. So – I’ll be talking about them in a blog post soon, but I wanted to write down my thoughts on project health first to give that post some context.

So, how do I assess project health?

I work with different technologies, and the exact measures vary depending on the ecosystem I’m working in. For example a module on drupal.org, a free WordPress plugin, or a repo or package on GitHub have different indicators which you can use. The general principles are the same though. I look at each of the following areas before making my decision.

  • Stability
  • Active maintenance
  • Release management
  • Documentation
  • Code quality

For each one you can just weigh things up to get to your gut feel. You can use a fancy scoring matrix if that floats your boat, or if you need to set rules / guidelines for a team. You might also have specific “red flags” in each area that would block you from using a project.

Here’s the things I look for.

Stability

What does it mean to be “stable”? In some eco-systems it might be that there is a release that’s marked as “stable”. Drupal.org for example lets module maintainers tag releases as stable / dev etc. Packagist packages generally follow semantic versioning allowing you to infer stability from the version number. However, as a concept it means that there have been a couple of releases, there is basic usage / installation documentation, and there has been some feedback in the form of issues / feature requests.

Some projects don’t even have a release (common with GitHub repos), or have only an initial release. This generally makes me uncomfortable, particularly because it makes it really hard to assess some of the other areas.

sail_wagon_edit1There’s nothing to say that new software is bad. However, new software is often subject to change, which can make extra work for you as integration / usage changes – or worse make you stick with an old version to avoid the pain.

I don’t think I’d ever red-flag a project based on “age” – after all newer projects haven’t always acquired “feature-bloat” either. However, it’s certainly easier to feel confident about an established project than a new one.

Active maintenance

abandonedThis covers a few things, and as ever there are a few different ways to measure it. If the commit history is available, I’d look at how recent the latest commits are, and how sporadic they are. Of course – no recent commits isn’t always a bad thing – stable software doesn’t necessarily need changing regularly. I’d also look at issues raised against the project (if that’s available), to see if issues are responded to, and/or worked on. For GitHub repos, I’d look at outstanding pull-requests to see if they are merged and/or responded to.

If there are issues / pull-requests backing up, and no sign of those being worked on / merged it would definitely count against the project.

Release management

package-v1-0-0This looks at whether there are releases firstly – I’d hesitate to depend on a project from which you alway just had to go with an arbitrary commit as the version you’re using.

Where there are releases, it’s important to check that they are “usable”. This means a few different things:

  • that the version numbering is sensible (semver preferably)
  • that each release has clear, plain-english release notes – a list of commits since the last release does not count
  • releases are made with a relevant frequency, not too often, not too rarely
  • that releases aren’t regularly superceded by bugfix releases to the release

Documentation

A package that you’re going to pick up and use in your project should have some level of documentation.

Important note to developers: If your software has no releases, and no documentation you don’t have an “open-source” project, you’re just hosting your version control in public.

I’m not going to suggest that you only use software that has pages, and pages of documentation. At the bare minimum though I’d expect a project to have a short document that explains:

  • what the software should do
  • what the software isn’t expected to do
  • how it should used
  • important dependencies
  • basic ‘getting started’ instructions

Code quality

As a developer, I’m fortunate enough that I can generally look at the code and see how well I think it’s written.

I generally check for basic security precautions being taken (proper escaping of SQL to avoid injection, use of tokens to prevent CSRF, and output escaping to avoid XSS). I also check that the software fits the general approaches taken by the eco-system in which it fits. I’ve found that adherence to eco-system best practice is usually a good barometer for whether its been developed by someone who has taken care with their code.

If you’re non technical, or perhaps don’t have experience in the technology you’re pulling in, then if you know someone who is skilled – it’s worth asking them to give it a quick review.

Summary

Hopefully this has given you a feel for some of the things I look at when deciding whether to use a new module / plugin / package. If you’re not doing any evaluation right now – I’d encourage you to start. It saves time in the long run.

Photo credits:


This is post 12 of 17 in the series “Stuff I've Used”

A series of short blog post covering software components / services I’ve used on projects to say thanks to the authors, and share them with others who might find them useful.

  1. Stuff I’ve used
  2. Error tracking with Sentry
  3. Autotrack for Google Analytics
  4. WordPress performance tracking with Time-stack
  5. Enforce user password strength
  6. WYSIWYG with Summernote
  7. Backing up your Laravel app
  8. Adding Google Maps to your Laravel application
  9. Activity logging in Laravel
  10. Image handling in PHP with Intervention Image
  11. Testing Laravel emails with MailThief
  12. Assessing software health
  13. IP Geolocation with MaxMind’s GeoLite2
  14. Uptime monitoring with Uptime Robot
  15. Product tours with Hopscotch
  16. Background processing for WordPress
  17. Using oEmbed resources in Laravel

October 28, 2016
by Lee
0 comments

Testing Laravel emails with MailThief

The last couple of Laravel projects I’ve worked on have all included important emails being delivered. It was important that the triggering of these emails could be tested. I also needed to make sure that the correct email was being sent, as some processes would trigger different emails based on the data input.

In the first project, I relied on Mockery to test that Mail functions were called, e.g.

Mail::shouldReceive('send')
  ->once()
  ->with(
    'emails.enquiry',
    Mockery::any(),
    Mockery::any()
  );

This allowed testing that the correct email was being triggered. However if you want to test in more detail that that, for example testing that data from input has been inserted correctly into the email content then it gets a lot less straightforward. On the next project I tried to evolve how I was testing emails. I needed to do some more detailed testing on email contents, so I turned to the MailThief package.

This allowed me to easily test not only that emails were being triggered, but specific tests against the email content. Here’s some examples from my tests:

$this->seeMessageFor($company->email);
 $message = $this->lastMessage();
 $this->assertTrue(
  $message->contains('Web enquiry</title>'),
  $message->getBody('html')
 );
 $this->assertTrue(
  $message->contains('0100 000000'),
  $message->getBody('html')
 );
 $this->assertTrue(
  $message->contains('<a href="tel:0100000000'),
  $message->getBody('html')
 );

I find it much more consistent to keep assertions after the actions in my test rather than having them as expectations before my actions. The package has proved so flexible that I’ll be using it for all email-related tests in future.

Thanks Tighten Co!

This is post 11 of 17 in the series “Stuff I've Used”

A series of short blog post covering software components / services I’ve used on projects to say thanks to the authors, and share them with others who might find them useful.

  1. Stuff I’ve used
  2. Error tracking with Sentry
  3. Autotrack for Google Analytics
  4. WordPress performance tracking with Time-stack
  5. Enforce user password strength
  6. WYSIWYG with Summernote
  7. Backing up your Laravel app
  8. Adding Google Maps to your Laravel application
  9. Activity logging in Laravel
  10. Image handling in PHP with Intervention Image
  11. Testing Laravel emails with MailThief
  12. Assessing software health
  13. IP Geolocation with MaxMind’s GeoLite2
  14. Uptime monitoring with Uptime Robot
  15. Product tours with Hopscotch
  16. Background processing for WordPress
  17. Using oEmbed resources in Laravel

October 27, 2016
by Lee
0 comments

Image handling in PHP with Intervention Image

If you’ve done much with PHP you’ve probably come across its image handling libraries. Normally this involves using either the GD, or ImageMagick.

These work reasonably well, but there are a number of disadvantages:

  1. The APIs are thin wrappers around the relevant image libraries. Neither of them offer particularly developer-friendly APIs, and the two APIs aren’t equal enough to make switching between them simple.
  2. You have to know which library your server has in order to start developing, or make extra work, and support both.

On a recent project I needed to do image manipulation (thumbnail generation etc.), and came across the Intervention Image library. This is a PHP library that can be used in any PHP project, and offers a much improved API for working with images. The API is agnostic to whether you’re using ImageMagick, or GD, so you can swap between them at will without having to re-code your application.

Next time you’re working with images, check out Intervention Image.


This is post 10 of 17 in the series “Stuff I've Used”

A series of short blog post covering software components / services I’ve used on projects to say thanks to the authors, and share them with others who might find them useful.

  1. Stuff I’ve used
  2. Error tracking with Sentry
  3. Autotrack for Google Analytics
  4. WordPress performance tracking with Time-stack
  5. Enforce user password strength
  6. WYSIWYG with Summernote
  7. Backing up your Laravel app
  8. Adding Google Maps to your Laravel application
  9. Activity logging in Laravel
  10. Image handling in PHP with Intervention Image
  11. Testing Laravel emails with MailThief
  12. Assessing software health
  13. IP Geolocation with MaxMind’s GeoLite2
  14. Uptime monitoring with Uptime Robot
  15. Product tours with Hopscotch
  16. Background processing for WordPress
  17. Using oEmbed resources in Laravel